Theme images by Storman. Powered by Blogger.

Saturday 28 March 2015

Fileice Survey Bypass/Complete In A Minute Latest [Working] 2015

- No comments
fileice_survey_bypass_complete_in_a_minute_latest_working_2015
Bypass Fileice Survey In A Minute
Namaste :) In this post we are back with a awesome tutorial 'How to complete/bypass Fileice Survey'. Yes! Now you can complete or bypass fileice survey by your own, you don't need any software or bypass tool. As we all know that all the tools and software those offers to get direct link of Fileice files are fake and not working. So today I'll guide you to complete fileice survey to get your desired file instantly. 

There are lot of website which are posting Fileice survey completion guide. But most of them are fake and doesn't providing real and working method to bypass fileice surveys. Don't worry in this post I'll teach you step-by-step 'How you can complete Fileice Survey in a minute'. 

By this trick you can bypass any survey. This method is also works on Cleanfiles, Sharecash etc. So read full post and be prepared to bypass any kind of Survey by itself. After reading this post you won't need to ask or beg anyone to bypass your survey link.


How To Bypass Filiece, Sharecash and Cleanfiles Survey - 


Step 1. First of all you must have a VPN or Good Proxy of US.

Step 2. Now connect VPN with US server and check your ip location from Here!

Step 3. Then open Fileice Link in Internet Explorer or Google Chrome.

Step 4. Now click on 'Regular Download' and select any survey, a new tab will open. 

how_to_complete_fileice_survey


Step 5. Now Click on 'No thanks continue' in top right corner and then answer some useless questions. :P 
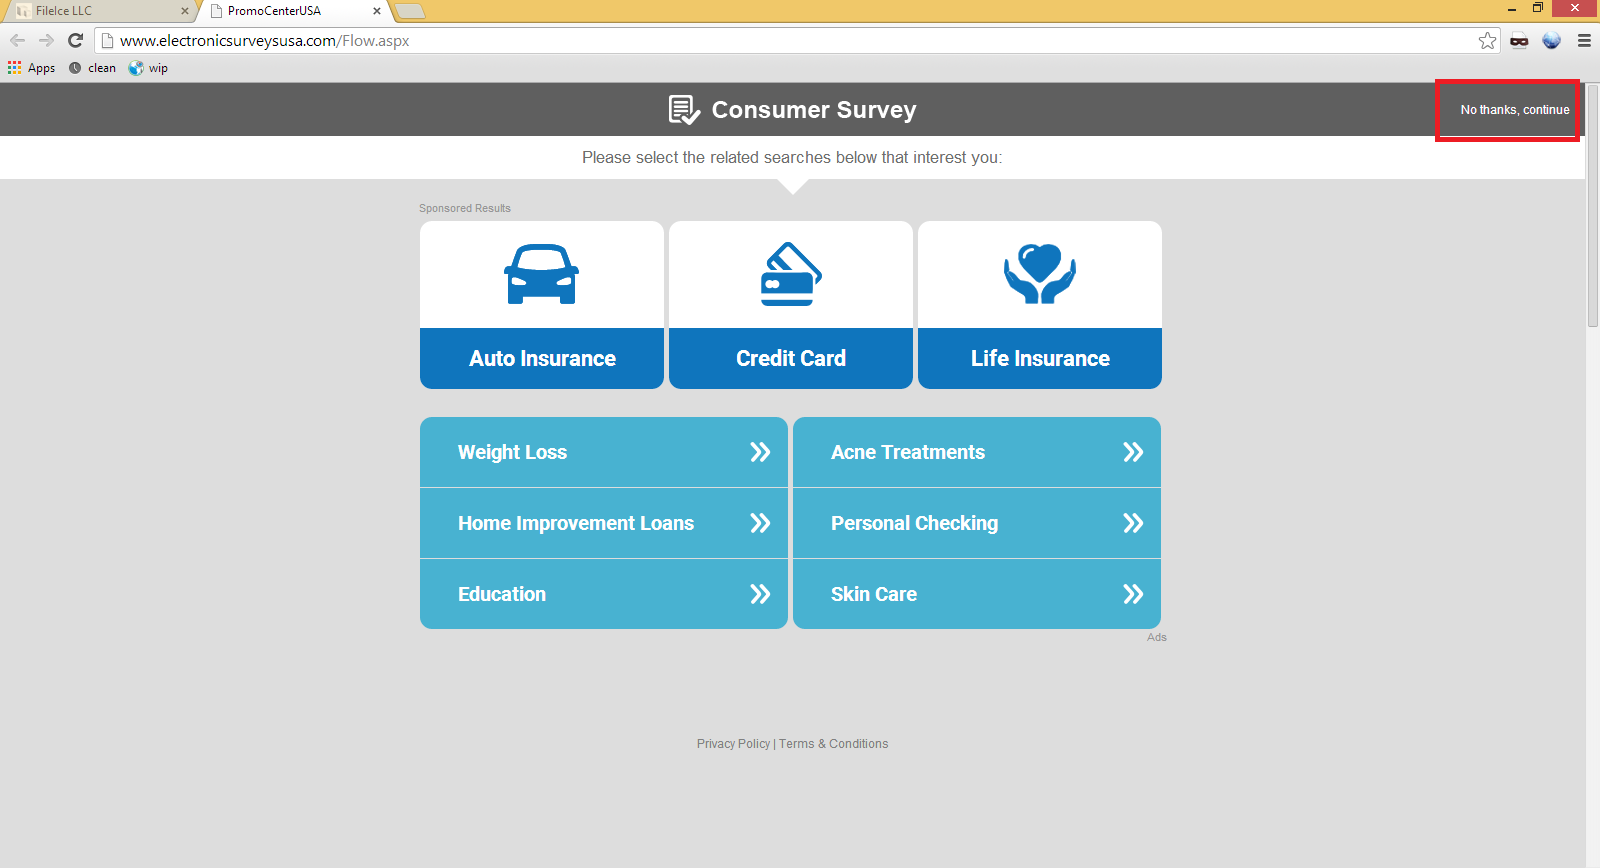
fileice_survey_bypass_trick_latest_2015

Step 6. Here fill fake info ex: Fake Name, Fake Email etc. 
bypass_fileice_survey_easily_full_guide


Step 7. Click Continue and then fill fake mobile no. , Age etc. 
fileice_survey_unlock_in_a_minute


Step 8. Now click on Continue. And that's it now your file will start downloading. 
how_to_bypass_fileice_sharecash_cleanfiles_survey_in_a_minute


How To Bypass Filecie Survey In A Minute Full Video Working


Note:- If the file not unlocks after 1st attempt then choose another survey and do the same. You will surely get your file unlocked. :) 


Download Unlimited UDP VPN 


Unlimited UDP VPN Free


If you have any query or questions regarding this post then don't hesitate to ask in comments. We are always happy to help others.


If you liked this post then please share this post with your friends on Facebook and other social sites because 'Sharing is Caring' :)


Share+Like+Comments - Thank You! :)


Friday 27 March 2015

WIBR Plus Wifi BRuteforce Hack Pro Apk 1.0.3 Full Android 2015

- No comments
hack_wifi_password_in_android_smartphone
How To Crack Wi-Fi Password In Phone
Namaste :) In this post I will explain how to hack/crack Wi-Fi password in your Android device/smartphone by using Wibr Plus Pro APK. Yes you can crack wifi password in your phone. It's simple and very useful app by which you can easily crack password of any wifi network near you. Wibr Plus is an application specially developed to access Wi-Fi networks which are using WPA/WPA2 PSK encryption. This application is to test the security of your Wi-Fi network. This App isn't fake and it's working perfectly. It is possible to access Wi-Fi network if it uses weak password

Also Read - Approve Google AdSense On Your Blog In A Minute

Description of Wibr Plus Pro APK :- 

wibr_plus_apk_hack_wifi_in_phone
how_to_crack_wifi_password_in_smartphone
Wibr+ Wi-Fi Network Security Test


How to Hack/Crack Wi-Fi Password by Wibr+ -


1. First of all list the available wifi networks and select that you want to crack. Wibr+ is tested on WPA/WPA2 with PSK (Pre-Shared Key). Please note that if signal strength is weak result may unreliable.

2. Now select dictionary that you want. There are 3 predefined wordlist which you can use. These dictionaries contains all commonly used passwords.

3. Wait for the results. It may take looooong time due to device strength. Wibr+ is also Battery eater. ;)


Please Note That Hacking Someone Else's Wi-Fi Network Is Illegal! This Tutorial Is Only For Educational Purpose. Use Only To Test Your Own Wi-Fi Network. We Are Not Responsible For Any Illegal Use Of This Tool. Hope You Understood.


Download Wibr Plus Pro APK 

Download Wibr Plus Pro APK Free 

Password - onlyhax


If you liked this post, please share this post with your friends on Facebook and other social sites because 'Sharing is Caring' :)


Also visit - Unlimited Free Mobile Recharge


If you have any questions regarding this post don't hesitate to ask in comments below.

Keep visiting daily to know more such hacks and tutorials. ;)


Share+Like+Comments-Thank You! :)

Sunday 22 March 2015

Hack Wi-Fi Network Using zANTI In Android Device/Smartphone [Latest]

- No comments
hack_wifi_network_by_using_zanti_in_your_android_device_smartphone
Hack Wi-Fi Network
Namaste :) - In this post I will explain you all 'How to Hack in to any Wi-Fi Network using zANTI Android Application'.

Zanti is an  Android Network Analysis and penetration suite which aims to offer to IT security experts/geeks the most complete and advanced professional toolkit to perform network security assessments on a mobile device. Once dSploit is started, you will be able to easily map your network, fingerprint alive hosts operating systems and running services, search for known vulnerabilities, crack login procedures of many tcp protocols, perform man in the middle (MITM) attacks such as password sniffing ( with common protocols dissection ), real time traffic manipulation etc .


Features Of Zanti Premium APK


WiFi Cracking
The WiFi scanner will show in green access points with known default key generation algorithms, clicking on them allows you to easily crack the key, supported models - Thomson, DLink, Pirelli Discus, Eircom, Verizon FiOS, Alice AGPF, FASTWEB Pirelli and Telsey, Huawei, Wlan_XXXX, Jazztel_XXXX, Wlan_XX, Ono ( P1XXXXXX0000X ), WlanXXXXXX, YacomXXXXXX, WifiXXXXXX, Sky V1, Clubinternet.box v1 and v2, InfostradaWifi.
Trace
Perform a traceroute on target.


zanti_premium_apk_full_tutorial_crack_wi-fi_with_free_tool_in_android
Hack Wi-Fi Network With zANTI


Port Scanner
A syn port scanner to find quickly open ports on a single target.

Inspector
Performs target operating system and services deep detection, slower than syn port scanner but more accurate.

Vulnerability Finder
Search for known vulnerabilities for target running services upon National Vulnerability Database.

Login Cracker
A very fast network login cracker which supports many different services. 

Packet Forger
Craft and send a custom TCP or UDP packet to the target, such as Wake On LAN packets.

MITM(Man-in-the-middle) Attack
A set of man-in-the-middle tools to command & conquer the whole network.

Simple Sniff
Redirect target’s traffic through this device and show some stats while dumping it to a .pcap file.

Password Sniffer
Sniff passwords of many protocols such as http, ftp, imap, imaps, irc, msn, etc from the target.

Session Hijacker
Listen for cookies on the network and hijack sessions.

Kill Connections
Kill connections preventing the target to reach any website or server.

Redirect Traffic
Redirect all the http traffic to another address.

Replace Images
Replace all images on webpages with the specified one.

Replace Videos
Replace all YouTube videos on webpages with the specified one.

Script Injection
Inject a JavaScript in every visited webpage.

Custom Filter
Replace custom text on webpages with the specified one.

How To Hack Wi-Fi Network Using zANTI [dSploit] Full Video


How To Install Zanti Premium APK ?


  1.     Download the APK from below.
  2.     Transfer it to your mobile.
  3.     Install The file.
  4.     Enjoy!!! You Have Zanti APK [dSplit.apk]. One of the best hacking app for android.


Requirements for Zanti


  1.     ARM - Your device must have an ARM cpu.
  2.     Gingerbread - An Android device with at least the 2.3 ( Gingerbread ) version of the OS.
  3.     Root - The device must be rooted.
  4.     BusyBox - The device must have a BusyBox full install, this means with every utility installed ( not the partial installation ).


Download zAnti Premium APK

Download zAnti Premium APk


This tutorial is for educational purpose only. We are not responsible for any illegal use of this tut. Hope you understood. :)


If you liked this post, please share this post with your friends on Facebook and other social sites because 'Sharing is Caring' ;)

Do visit regular for more such tutorials and hacks. :)

Comment+Share+Like=Thank You! :)

Saturday 21 March 2015

Approve Google Adsense In A Minute After Disapproved/Rejected [Full Tutorial] [Latest]

- No comments
AdSense Disapproved/Rejected Fix
Namaste! :) In this post I am back again with the solution of a very common issue 'AdSense Disapproved/Rejected'. It is as 'Google have any personal problem with me, it always disapproves my application'. ;) But it's not like that, Google AdSense only approve those blogs or website which compile with their terms and conditions. But if your blog or website disapproved for AdSense, then this post is for you and its very helpful. 
As I also faced the same problem and I was tired because every time I apply for AdSense, only one email from Google AdSense 'Unfortunately after reviewing your blog/website we are enable to approve your application at this time' :( Isn't it ridicules ? Yes it is. But after so many attempts I got success, finally Google AdSense Approved on my blog/website.
And now I can show ads on my blog without any further issue. And it's ultimate and very simple trick to get Approved for Google AdSense. You can also find many posts and articles on web about 'How to get fully Approved Google AdSense'. But most of them are useless and some are very difficult. 
But after read this post you won't need to find another solution for this issue, because it's confirmed working and tested by me. And by this method you will definitely get Fully Approved AdSense Account for your blog/website. 
So lets start and follow the below steps accurately, if you want to Approve Google AdSense on your blog/website:

Steps to be followed - 
Step 1. First of all create a YouTube Channel and upload some unique videos. [Don't upload someone's else video]
Step 2. Now after that enable Monetization on your YouTube videos. To do so go to My channel > Videos Manager > Channel > Monetization and enable Monetization.
adsense_approval_trick_confirmed_working_2015
google_adsense_disapproved_fix
Enable Monetization on YouTube Channel
 Step 3. Now YouTube will ask you to associate an AdSense account with your YouTube Channel to get revenue. 
Step 4. Then associate AdSense account by following screen instructions. [Go to > Here! and click Next ]
enable_monetization_on_youtube_channel
Associate AdSense Account With YouTube Channel

Step 5. Now after that you will get an email from Google AdSense that 'Your AdSense account is approved to show ads on your YouTube videos' 

Step 6. Now go to your AdSense account make sure that it's fully activated.

Step 7. Then go to your blog dashboard on which you want to apply AdSense and navigate to Settings > Basic > Permissions > Blog Authors, here click on +Add authors and enter that Gmail id on which you got approved AdSense for YouTube and click Invite.


adsense_approve_on_your_blog/website_within_a_minute
Add New Author


Step 8. Then open your AdSense approved email id and you will find an email of invitation to contribute for blog, open it and accept invitation.

Step 9. Now go to you Blog dashboard > Earnings > Switch account and use your approved email id and click on Continue.


google_adsense_account_approval_trick_working
Switch AdSense Account
Step 10. That's it you will see a message that 'Congratulation! The AdSense widget has been added to your blog template.' Now click on Continue and setup ads on your blog/website. :)


adsense_approved_on_blog/website_in_a_minute
AdSense Approved 
Now you can show ads on your blog/website without any issue. And by using this method you need not to wait a long to get reply from AdSense. So guys I hope you enjoyed this tutorial. :) 
I also created a video of this, by which you can better understand the steps. So watch the full video and enjoy your fully Approved Google AdSense Account :) 

How To Approve Google AdSense On Blog In A Minute [Working]


So if you liked this post, please share this post with your friends on Facebook and other social sites because 'Sharing is Caring' :)


If you have any query or questions regarding this post, then don't hesitate to ask in comments below. We will reply ASAP. :) 


Share+Like+Comments - Thank You! ;)

Friday 20 March 2015

Hideninja Vpn Elite v6.3.0 Full APK Pro Free Download

- No comments
hideninja_vpn_elite_full_apk
Hideninja VPN Elite
Hideninja VPN Elite Full Version
Hideninja VPN offers access to all blocked websites and apps such as YouTube, Facebook, Netflix, BBC, Skype and Google, as well as Wi-Fi Security. Hideninja VPN also protects your online activities and makes you fully Anonymous. Hides your all online surfing, downloading etc. It makes you fully hidden and anonymous user. 


Features of Hideninja VPN

  •  Encrypts all traffic on your device for ultimate privacy.
  •  Unlimited time, speed and bandwidth – for free.
  •  Access to media content, video, social networks and messaging apps all around the world.
  •  Unblocks YouTube, Facebook, Google, Twitter, Netflix and other locally blocked sites via your favorite browser.
  •  Wi-Fi Hotspot Security.
  •  Unblocks VoIP apps like Skype and Viber.
  •  Prevents private data leaking and hacker attacks.
  •  Masks your IP address to browse the web privately & anonymously.
  •  Bypasses firewalls while travelling or being at work or school.
  •  Connects to the VPN servers in different countries – you can choose by yourself.
  •  VPN Hideninja works like a proxy but with richer functionality.
  •  Protects your identity, prevents tracking.
  •  No activity logs!
  •  No system root required.
 Screenshots
hideninja_vpn_elite_v6.3.0_full_apk_free_download


free_download_hideninja_vpn_premium_full_apk


FREE VERSION VS. ELITE VERSION

The free version contains ads. The elite version is ad-free. There are no other differences.


NOTES

• Hideninja makes a secure encrypted VPN tunnel from your device to one of its private servers. All traffic going through this tunnel is completely secured and anonymous.
• App Permissions are asked to enhance Internet security.
• Some devices are not compatible with Hideninja. Please contact your device manufacturer to check if it supports VPN.
• Hideninja is not compatible with Android OS 3.x versions and older.
• It support 3G/4G/LTE/GSM mobile connections, Wi-Fi.


What's New


  • Issue with lost Elite (Premium) status after update to ver. 6.2.9 fixed
  • Critical bugs fixed
  • Small user interface improvements
  • Elite” renamed to “Premium”


Watch the video below to know more about Hideninja Elite VPN


How to Install Hideninja VPN ?


  1. Save the downloaded .apk on your android phone's SD card
  2. Run and install it
  3. That's it, Enjoy!


Download Hideninja VPN Elite Full APk


 Hideninja VPN Elite Full APK Free Download


 If you liked this post, please share it with your friends on Facebook and other social sites because 'Sharing is Caring' :) 

If you have any query or questions regarding this post don't hesitate to ask in comments below. 

Keep visiting for more such tutorials and hacks. :) 

Share+Like+Comments - Thank You! :)

Thursday 19 March 2015

Airtel 3G UDP Trick Unlimited Confirmed Working [1st on net] [Latest]

- No comments
airtel_3G_UDP_Trick_Unlimited_Confirmed_Working
Airtel 3G Unlimited Hack


Namaste! :) In this post I am back with another Dhansu [awesome] Airtel UDP Trick which is confirmed working in many states. This Airtel Trick is unique and not available anywhere on the web except our site. 

This is exclusively available only on http://www.onlyhax.com . Our team was working on it since last two days and we got success. It's UDP Trick so there is not any speed capping issue and no sim blocking problem. 

You can use Unlimited 3G Free without any speed capping and data limit. There is no limitation of this Airtel Unlimited 3G Trick. There are many blog and website which offers Airtel 3G Trick but the fact is those all tricks are either fake or limited. 

But this trick is neither limited nor fake. So download this trick as  soon as possible and enjoy Unlimited Airtel 3G for free. So lets start:

Features of Airtel 3G Unlimited UDP Trick - 

  • Unlimited Data Downloading 
  • No Speed Capping Issue
  • Fastest Speed :)
  • Torrent Supported With High Speed
  • Https Supported
  • No Sim Block Problem
  • No Disconnection 
  • Enough! :v

Working States [Confirmed] of Airtel 3G UDP Trick - 

  • Haryana
  • Rajasthan
  • Delhi
  • MP
  • UP
  • Punjab

Note - Except above mentioned states, we didn't check this trick. So try in your state and let us know if it works or not.


Requirements for Airtel 3G Trick - 

  • 3G Enabled Airtel Sim Card 
  • APN - [In Attachment]
  • PC or Smartphone
  • VPN - [Explained in Attachment]

Screenshot
airtel_3g_hack_udp_with_unlimited_downloading
Airtel 3G UDP Trick Confirmed Working


How To Use Free 3G Internet by Airtel UDP Trick - 


Everything about how to use explained step by step in Attachment download from below given link.

Download Airtel 3G UDP Unlimited Trick [1st On WEB]


Download Airtel 3G UDP Trick Free


I hope you enjoyed this article, so if you liked this post please share this post with your friends on Facebook and other social sites because 'Sharing is Caring' :) 

If you have any question or query regarding this trick. Don't hesitate to ask in comments below. 


Share+Like+Comments=Thank You! :)

MTNL 3G Unlimited UDP Trick Confirmed Working 2015 [Latest]

- No comments
mtnl_3g_unlimited_udp_trick_confirmed_working_latest_2015
MTNL 3G Unlimited 3G Trick
Namaste! :) MTNL 3G Unlimited - 

Its time to enjoy MTNL 3G free with unlimited data bandwidth. Yes! You read right, in this post I am gonna share with you all  MTNL 3G Trick which is confirmed working with faadu [great] speed. Nowadays 3G plans are very expensive and data usages are increased. So in this situation you have a new way and that is called blackhat way. So to overcome this problem just follow the steps mentioned in attachment and enjoy Unlimited MTNL 3G Trick. This is just a simple trick that will make your day. ;)

Everybody know that 3G Tricks are as just a way to full fill your needs of unlimited data usages. Download the MTNL 3G Trick and use unlimited 3g without any problem. 


Features of MTNL 3G Unlimited UDP Trick - 


  • Unlimited Data Usages 
  • No Speed Capping Issue
  • Torrent Supported 
  • UDP Trick
  • No Disconnection Problem
  • High Downloading and Surfing Speed
  • Easy to Use
  • Working all over India where MTNL is Available


Requirements Of MTNL 3G Unlimited Trick -


  • MTNL 3G Enabled SIM 
  • Good Network Strength
  • Recharge- [In attachment]
  • PC or Mobile
  • APN - [In attachment]
  • No VPN Required :)

 Screenshot
mtnl_3g_trick_unlimited_download_with_awesome_speed
MTNL 3G Unlimited Trick [Speed]


So this is just awesome and easy to use MTNL 3G trick. Just download it and enjoy freedom of unlimited 3G ;)


Download MTNL 3G UDP Trick 


Download MTNL 3G Unlimited Trick Working


If you liked this post then please share this post with your friends on Facebook and other social sites because 'Sharing is Caring' :)

If you have any question or confusion, don't hesitate to ask in comments below. We are always happy to help others. :)


Share+Comment+Like=Thank You! ;)

Saturday 14 March 2015

Snapdeal Loot - Refer & Earn Snapdeal Cash [Rs 50/Refer]

- No comments
snapdeal_loot_refer_and_earn_snapdeal_cash
Snapdel Loot - Hack SD Cash Trick
Snapdeal is back again with refer and earn program where you can earn unlimited Snapdeal cash by referring your friends. You can use this Snapdeal Cash to shopping on Snapdeal website. This offer is awesome for those who has big circle of friends so that they can share their own referral link to install Snapdeal Android application. So stop wasting your precious time and start looting Snapdeal application by following below given steps.


Snapdeal Now Giving Rs.50 Per Referral  & SD Cash Amount Increased To Rs.500 Again

earn_unlimited_snapdeal_cash_latest_loot
Snapdeal Hack Trick Unlimited SD Cash 


Follow below steps :

Step 1. First install Snapdeal App in your smartphone [You can also use YouWave]

Step 2. After installation complete open Snapdeal App and click on 'EARN REWARD'

Step 3. Now enter Invite Code -  qWWq244350 to get Rs 50 Snapdeal Cash and then enter your mobile no. in below box and click on 'Continue'

Step 4. Then  confirm OTP and then sign up or sign in to continue.

Step 5. Now click on 'Invite and Earn' and note down your own Referral  Link

Step 6. Now to earn Unlimited Snapdeal Cash Just follow the above steps but use your own Invite Code and use different Mobile No.


You can aslo use Youwave for unlimited SD Cash Loot. To do so just factory reset Youwave after every registration. For each successful referral you will get 50rs SD Cash and your referral too.


NOTE - In Youwave downloading Snapdeal app form playstore will not give you Reward option so download Snapdeal APP from below given link to get that option in Youwave.

Download Snapdeal APP for Youwave : 


 Download Snapdeal APK To Loot by Youwave

Its depend upon how many number you can arrange. Per mobile no. you will get 50rs SD Cash. So arrange as many as number you can and earn unlimited Snapdeal Cash.


Note - You can earn maximum 500 rs per account so changer Invite code after collecting Rs. 500 and use another account's Invite and continue the process. :)


Hope you enjoyed this earning method. If you liked it please share it with your friends on Facebook and other social sites.

Get Unlimited Recharge From Ladooo APK

- No comments
ladoo_loot_earn_unlimited_mobile_recharge_from_ladooo_applicaton
Unlimited Recharge Hack Trick - Ladoo Loot
Namaste :) In this post I will share a trick to get unlimited mobile recharge from Ladooo App. As we know that Ladooo is the best android application that provides free mobile recharge for downloading different types of applications and referring others. But now they just started paying to download other application via ladooo app so this trick is based on that. So to get unlimited mobile recharge from ladooo application you have to just follow some simple steps.


For this trick you must have an Android Emulator such as Bluestack and Youwave.


Follow below given steps to get unlimited mobile recharge -


  • First of all download ladoo application from Here!

  • Now after download, install app and register. 

  • After registration open Ladoo application and you can see many refer and earn application such as Twitter, Snapdeal etc.

  • Now just select any one application and note down you referral link to download that app. 

  • Now open Youwave or Bluestack and open browser and paste your link and download that application and install. 

  • Once you installed you will get money in your Ladooo wallet. 


 For Unlimited Loot :- After downloading all referral applications just factory reset Youwave or Bluestack and again download your own referral application and earn unlimited mobile recharge form Ladooo app.

Note:- If error occurs just change email id in playstore and start earning. ;)


If you liked this post please share it with your friends on Facebook and other social networking sites because 'Sharing is Caring'.


If you have any question or any problem during earning, don't hesitate to ask in comments.


Share+Like+Comments=Thank You! :)

Friday 13 March 2015

BSNL DNS Premium Working Trick March 2015 [Openly Posted] [No Survey]

- No comments
new_latest_bsnl_3g_unlimited_dns_trick_2015
BSNl Premium DNS Trick
I am back again with new BSNL Trick. In this post I'll share a New BSNL DNS Ticks which is working for last many days with awesome downloading speed. According to me this trick is confirmed working in UP E/W, Delhi, Haryana, Rajasthan Guj. So I am pretty sure this BSNL DNS Prmeium trick will also work in your state. As we know BSNL DNS trick works with APN - blackberry.net.
 
Well first you have to activate bsnl bbm plan on your BSNL sim because this BSNL Premium DNS trick working on it.

Mainly I suggest you two bbm plans:

  1.  7 days 97 rs bbm plan (1st give it a try and don't forget to reconfirm bbm plan according to your state)
  2.  30 days 303 rs bbm plan
You can activate these BSNL BBM plans by going to retailer shops, as there is no way to activate BBM plans in BSNL by sms. You can also recharge BBM plan using online recharge sites such as Paytm.com and Freecharge.com.

Note - These BBM packs is every state is different so please 1st confirm BBM plan in your area and them activate it. 

Now once BBM pack is activated on your BSNL Sim try to connect with APN - blackberry.net

 Then go to Coonetion settings and click on connected connection > Properties > Ipv4 settings and put below mentioned DNS


Primary DNS
8.8.8.8
Secondary DNS
8.8.4.4

Now save it and set it to default(as shown in screenshot below)
bsnl_premium_dns_working_3g_unlimited_trick_march_2015
DNS Settings For BSNL 3G Unlimited Trick
Now Try to connect 4-5 times until it get connected.
 
When connected it means your BBM plan is activated now. And you are ready to surf and download at 3g speed in BSNL for free with unlimited bandwidth. 

Unfortunately if these dns servers not work for you then try any udp vpn and connect with it. And enjoy Unlimited BSNL Premium DNS Trick. 


I hope you enjoyed this trick. If you liked this post then please share this post with your friends on Facebook and other social sites because 'Sharing is Caring'. 


Keep visiting for more such tricks and tutorials. :) 

If you have any questions regarding this trick don't hesitate to ask in comments below. 

Comment+Like+Share=Thank You! ;)

Monday 9 March 2015

How To Earn Extra Money With Your Websites Or Blog [Guide] [UPDATED]

- No comments
how_to_earn_extra_money_from_your_blog_or_website_full_guide_latest
Earn Extra Money

Extra Earning With Your Websites


Guys if you are running your blog and website by uploading files and want to earn some extra money, now today I will share with you some of the real and genuine sites which are giving the user's money for more than a year and are trusted one. You can search on every format regarding these sites, you will come to at one point as these are real and trusted sites for earning  by uploading sites.
Also there are lot of sites which gives the money but these sites are one of the best while in case of withdraw your money and in other services. The sites with their maximum uploading files rates are listed below with brief explanation and signup methods. If you are running your sites with only 1000 viewers everyday, you can easily make more than 10$ by these sites, and there are no limits for earning


UsersCloud
UserCloud is the best site which I ever saw and gives maximum revenue, as using it you can earn even 10$ in a day and good thing is that it's minimum withdraw is 5$, also other features of that site are :
  • Unlimited Storage
  • Unlimited Downloads
  • Unlimited Upload
  • Unlimited file size
  • Files Never Deleted
  • Remote URL upload
  • Download-Accelerators support
  • Downloads resume
  • Unlimited Download Speed
  • No downloads delay
  • No downloads captcha
  • FTP
  • No Advertisements
Accepted payout method is Paypal yet, but I have talked to admin of that site, and more payout method will be introduced in next years. So hurry up guys and register on this amazing site. Link has been provided above for the site info and registration.
Rapidgator
Rapidgator is one of the best and trust worthy site which gives upto 40$ by uploading files on their site, also it has more than 2000 GB Free storage for your files. For earning from rapidgator, you just need to signup on this site and just upload your files and start your earnings with them today. The signup link is Here !
Withdraw notes : First you cannot get money at once, for this you will have to upload the files and then will get different rates on the basis of sizes of files, but you can earn maximum from them after signup and also it the good and reliable hosting site; by using this site, you can get cheap and better hosting for your site as well. Minimum withdraw is 15 USD. Accepted Payment method is webmoney.
Tusfiles
Tusfiles is also best and trustworthy site for the earning by uploading, you can earn maxium 10 USD after 1000 uploaded files download, also they give the point on the basis of download. Use it and start making money, also they have user friendly and good staff which gives response quickly. To earn with tusfiles, just signup and start uploading the files and earn the maximum with them.
Withdraw notes : It gives the withdraw within 48 hours when you get the minimum amount of 10 USD. Accepted Payment methods are webmoney, payza, paypal, wire transformer, payoneer, perfect money, and amazon gift card.
Hugefiles
Hugefiles is also a trusted and good service which gives money on uploading the different types of files and gives revenue after downloading these files. It gives maximum of 25 USD after downloading of 10000 files. The minimum withdraw amount for this hosting site is 15 USD. To earn signup link is given below
Withdraw notes : Accepted Payout methods are webmoney and paypal.
Freakshare
It’s also a trusted site which gives more than 25 USD on 1000 downloads of your uploading site w.r.t size of your files.
Withdraw notes : The minimum withdraw is 15 USD and accepted payout method is webmoney.
Sendmyway
It’s also a good and newly designed upload hosting site which gives the maximum of 10 USD after 1000 downloads of your files.
Withdraw notes : The minimum withdraw is 10 USD and accepted payout method is paypal.

NOTE
There are lot of sites for this purpose, but these are the genuine sites which are not fraud or any other spamming sites which have given money a lot of user’s. Also you can ask any question regarding the topic. Guys as I have used referral links, so it’s your choice to whether trust me or not.

Monetization Tab Disabled On YouTube Fix [Latest]

- No comments
monetization_tab_disaled_on_youtube_account_fix
Monetization Disabled - Fix [Working]

How to enable Monetization In YouTube Account :- 


Its a big issue on the web that many of  YouTube users get Red icon on Monetization Tab, Monetization tab disabled. I faced the same problem without any notice or email warning from YouTube. I searched on web for the solution but I didn't get any working solution for this issue. After that I found a working solution by which I got my Monetization Tab Enabled again in just 8 hours. Its just a simple and working solution for this problem. So follow the below steps and fix "Monetization Disabled on this account" :-


Step 1. First login to your YouTube account.

Step 2. Then go to My Channel > Video Manager > Channel > Features and Status or click Here! [http://www.youtube.com/features/]
enable_monetization_In_youtube_account_working


Step 3. Now here you will see Red Icon in front of Monetization Tab if Monetization is disabled on your account.
Before
how_to_enable_monetization_on_youtube_channel_quickly


Step 4. Now click on Send Feedback [At the bottom of Left Pannel]

monetization_disabled_on_your_account_fixed


Step 5. After click a popup will open. Now in the text box paste this:
   
            Why has my Monetization Tab disabled and my account is in good standing.

Step 6. Now highlight all the text and icons till Monetization tab. (As shown in pic below)

get_monetization_on_youtube_videos_in_just_one_day


Step 7. Now Click Next > Submit. That's it.

Now after you successfully submit, you will get an E-Mail from Google or YouTube, that Your account is enabled for Monetization and you can Monetize all of your YouTube videos.

Watch Video (Below) For Better Understanding. 
 After
solve_monetization_disabled_on_your_account_in_youtube_channel


Monetization Disabled On Your Account Fix [Full Video]


Note :- If your account is not in Good Standing you will not get monetization feature back on your YouTube account. 


 I hope this tutorial will help you to solve your problem. :)


If you liked this post, please share it with your friends on Facebook and other social sites because 'Sharing is Caring'.


Comment+Share+Like = Thank You! :)

How To Setup Custom Domain For Your Blog In Blogger With Godaddy.com

- No comments
how_to_setup_custom_domain_name_to_your_blog_full_guide
Add Custom Domain Name To Your Blog
Setup Custom Domain For Your Blog - 
In this post I will explain "How to setup custom domain name for your blog". I will provide you very easy guide that will very useful for you and it will be 100% works. I will teach you how to setup custom domain name for your blog on blogger.com in easy way.

For Eg. your blogger domain name is www.xyz.blogspot.com and you have to redirect to www.xyz.com, thats it.


What Is Custom Domain ?

Firstly we must understand what actually custom domain is. Custom domain are likes .com(Commercial) , .org (organisation), .edu (educational) etc. are the types of first level domains.

Eg. www.google.com   (First level domain)
      www.abc.co.in      (Secondary level domain)


What Is The Need Of Custom Domain ?

When you apply custom domain for your blog, then your users  can easily remind domain. Blogger provides you www.xyz.blogspot.com  that will not easy to kept in mind. Then it will reduces our users. The best option for this is Custom domains. And custom domains also improve SEO of your Blog / Site. Now we will see step by step guide to setup custom domain.

Follow The Below Steps Carefully To Setup Custom Domain For Your Blog -


  • You have to buy custom domains from websites like Godaddy, Bigrock etc.
  • Suppose you are buying domain on Godaddy.com
  • Firstly login your www.blogger.com blog
  • Enter username and password.
  • Go in Settings > Basics option. See below screenshot

add_custom_domain_to_blogger_easy_way

  • Now look at the publishing section, your blog name will be appear then click on setup third party url for your blog link. Now enter your custom domain name like www.xyz.com see below screenshot to understand.
how_to_apply_domain_name_to_blogger_blog_easy_way
  •     After entering the url you will get warning we have not able to verify your authority to this domain  
  •     Now you will get Name, Label or Host and Destination, Target or Points To Fields. You can see above in Screen shot. For eg. www is your host and ghs.google.com is yuor points to  field.
  •      Now open another tab in your browser and go to your domain provider website like www.godaddy.com and enter your login details.
  •     Now login into your Godaddy account and click on My Account tab.
use_.com_domain_for_your_blog_with_godaddy_.com

  • Now you have to go on Domain Manager.
add_godaddy_domain_name_to_your_blogger_blog_full_tutorial

  •     In the domain manager page you will see option DNS MANAGER. You have to click on DNS MANAGER.
      
  •  Note that in DNS MANAGER you have to enter A(Host) and Cname.
     
  •   Now click on A(Host) tab you have to enter this 4 ip addresses one by one using add button.
    216.239.32.21
    216.239.34.21
    216.239.36.21
    216.239.38.21
  •     After you done adding records click on save button to save your records.

  • Now you have to enter your Cnames (alias). You Cname alias are www      ghs.google.com see below screenshot. Now you have to enter your Host and Points to Fields that's it. After adding records click on save.

  •  Now open your blooger.com blog and enter url then click on save button.
 You have done, now you have to wait for few hours to take effects in your ip records. Just relax and seat back. After few hours you will see that your blog address is redirects to your new custom domain. :) 

Note -  If you don't write your host www and points to ghs.google.com then if  users not type www in url field, then your site will not appear to them. So follow above steps carefully and setup your custom domain name.
 

It may take upto 72 hours to take effects in your ip records. I will suggest to you buy a domain name on Godaddy.com.

What you think right now it is easy to setup. Show your love in comments. :) And share this page on Facebook and other social sites.

If you liked this post, please share his post with your friends on Facebok and other socials sites because 'Sharing is Caring' :)

If you have any query regarding this post, don't hesitate to ask in comments below.  :) 

Keep visiting for more tutorials. :)